

Zabbix is an enterprise-grade open source monitoring tool designed to monitor and track applications, systems, and Network devices status.
Zabbix architecture uses the Server/Client model. The server communicates to the native software agents available for various Operating systems like Linux, NIX, and Windows. For systems without an agent, generic monitoring protocols such as Simple Network Management Protocol (SNMP) or Intelligent Platform Management Interface (IPMI) can be used.
Install Zabbix Server on Ubuntu 20.04
Installation of Zabbix has a number of steps and Prerequisites that we need to fulfill first. Among the dependencies required are:
- Apache httpd web service
- PHP
- MySQL/ MariaDB database server
Step 1: Install and Configure Apache httpd server
Upgrade system:
sudo apt update
sudo apt install apache2
After installing Apache, configure basic security by allowing Prod ServerTokens only.
sudo vim /etc/apache2/conf-enabled/security.confChange line 26
ServerTokens ProdThis directive configures what you return as the Server HTTP response. Valid options are Full | OS | Minimal | Minor | Major | Prod.
Set ServerName:
$ sudo vim /etc/apache2/apache2.conf
ServerName zabbix.example.com
Set Server Admin to receive an email in case of issues.
$ sudo vim /etc/apache2/apache2.conf
ServerAdmin admin@example.com
You need to restart apache web service after making these changes:
sudo systemctl restart apache2Step 2: Install PHP and required modules
Install all required PHP extensions using the commands below.
sudo apt -y install php8.0 php8.0-cgi php8.0-common libapache2-mod-php php8.0-mbstring php8.0-net-socket php8.0-gd php8.0-xml-util php8.0-mysql php8.0-bcmathThis will install php v7.x on Ubuntu , you can confirm using the command php -v
# php -v
PHP 8.1.7 (cli) (built: Jun 25 2022 08:12:59) (NTS)
Copyright (c) The PHP Group
Zend Engine v4.1.7, Copyright (c) Zend Technologies
    with Zend OPcache v8.1.7, Copyright (c), by Zend Technologies
Configure Apache:
sudo a2enconf php8.*-cgiEnsure you set correct timezone:
$ sudo vim /etc/php/*/apache2/php.ini
; http://php.net/date.timezone
date.timezone = "Asia/Kolkata"
Restart apache2 after this change:
sudo systemctl restart apache2Step 3: Install Mysql Database Server
Run the commands below to install Mysql database server:
sudo apt update
sudo apt install mysql-server
Once Database server installation is done open MySQL terminal
Welcome to the MySQL monitor.  Commands end with ; or \g.
Your MySQL connection id is 1824
Server version: 8.0.29-0ubuntu0.20.04.3 (Ubuntu)

Copyright (c) 2000, 2022, Oracle and/or its affiliates.


Oracle is a registered trademark of Oracle Corporation and/or its
affiliates. Other names may be trademarks of their respective
owners.

Type 'help;' or '\h' for help. Type '\c' to clear the current input statement.
Create a database and user for Zabbix:
CREATE DATABASE zabbix character set utf8 collate utf8_bin;;
GRANT ALL PRIVILEGES ON zabbix.* TO zabbix@'localhost' IDENTIFIED BY 'StronDBPassw0rd';
FLUSH PRIVILEGES;
QUIT
Step 4: Install Zabbix Server on Ubuntu 20.04
We need to add Zabbix repositories to get the latest release of Zabbix Server installed on Ubuntu 20.04
wget https://repo.zabbix.com/zabbix/5.0/ubuntu/pool/main/z/zabbix-release/zabbix-release_5.0-1+focal_all.deb
sudo apt install ./zabbix-release_5.0-1+focal_all.deb
Do system update and install Zabbix server packages
sudo apt update
sudo apt install zabbix-agent zabbix-server-mysql php-mysql zabbix-frontend-php
Import database data using the command:
sudo su -
zcat /usr/share/doc/zabbix-proxy-mysql/schema.sql.gz | mysql -uzabbix -p 'StronDBPassw0rd'
Step 5: Configure and Start Zabbix Server on Ubuntu
Zabbix configuration file is located under /etc/zabbix/zabbix_server.conf. Ensure the following lines are configured correctly.
DBName=zabbix
DBUser=zabbix
DBPassword=StronDBPassw0rd
Restart Zabbix server after modifying this file:
sudo systemctl restart zabbix-serverEdit /etc/php/*/apache2/php.ini to set php requirements for Zabbix server.
$ sudo vim /etc/php/*/apache2/php.ini
max_execution_time = 300
max_input_time = 300
post_max_size = 16M
Configure Zabbix agent to monitor Zabbix server itself.
$ sudo vim /etc/zabbix/zabbix_agentd.conf
Hostname=zabbix-server.computingforgeeks.com
Start and enable Zabbix Server:
sudo systemctl restart zabbix-server zabbix-agent apache2
sudo systemctl enable zabbix-server zabbix-agent apache
Configure Firewall
If you have ufw firewall installed and running on your system, ensure you allow port 5000 and port 5001
sudo ufw allow proto tcp from any to any port 10050,10051Step 6: Perform Zabbix initial setup on Ubuntu 20.04
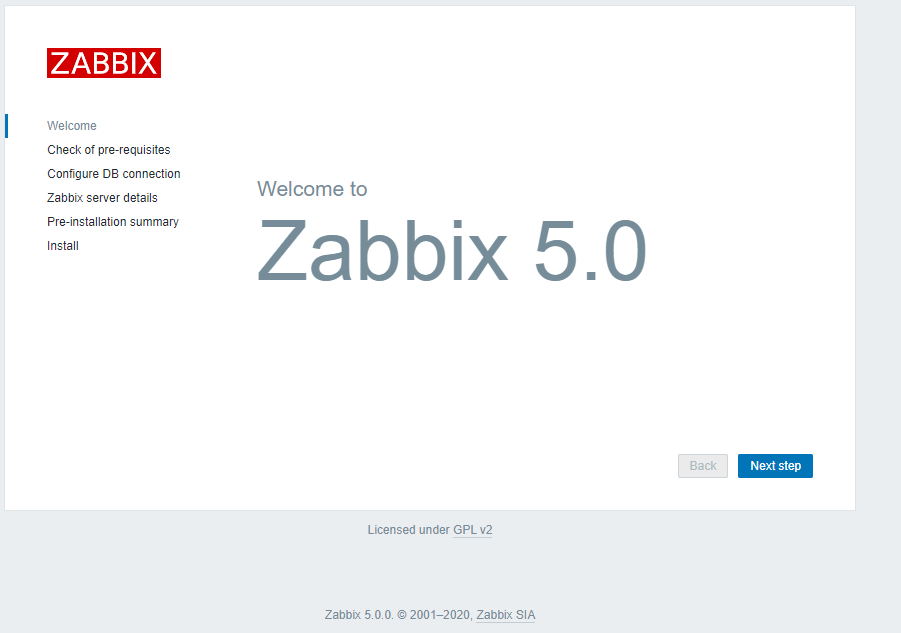
Access “http://(Zabbix server’s hostname or IP address)/zabbix/” to begin Zabbix initial setup.
Step 1 is a welcome page, click “Next step” to proceed.
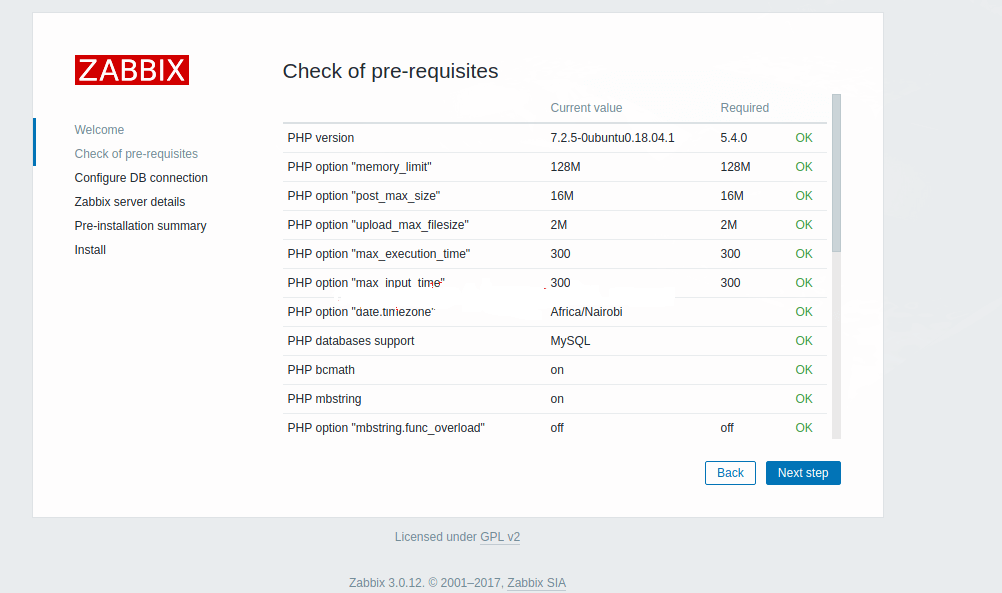
Confirm that all prerequisites are satisfied.
Configure DB settings as added before:
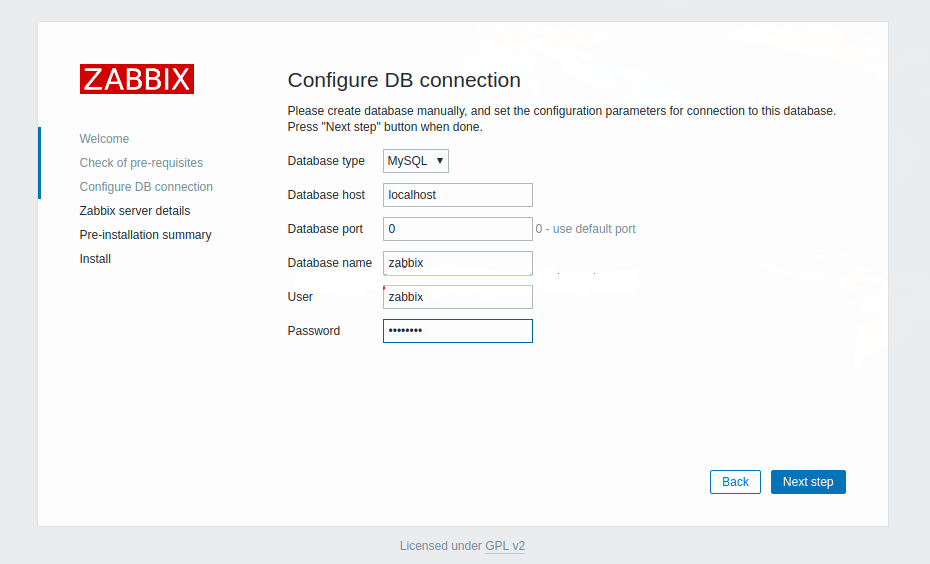
Verify all settings and click Next step to finish the initial setup.
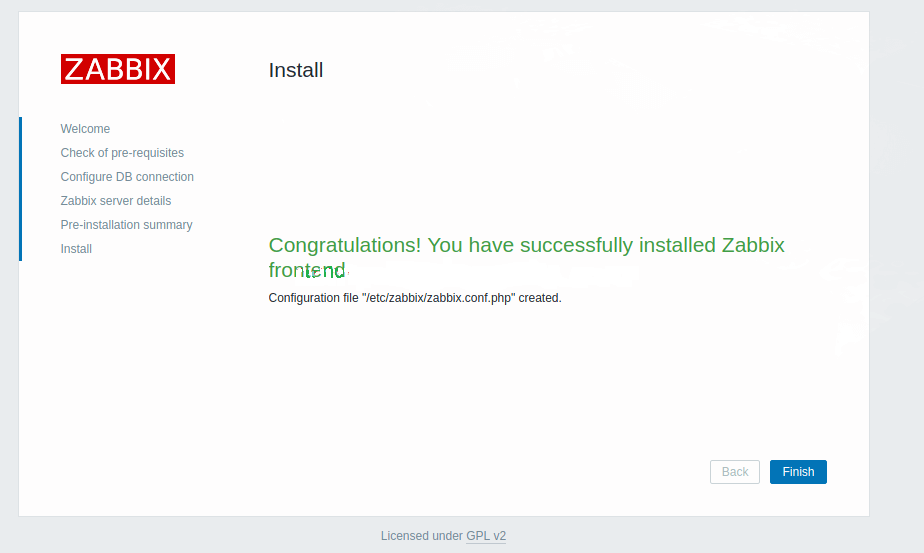
You’ll then get the login page. Default logins are:

Username: "admin"
Password: "zabbix"
Install and Configure Zabbix Agent on Ubuntu 20.04
How Zabbix agent works
Zabbix agent can do both passive (polling) and active checks (trapping). The checks can be performed at an interval or based on a specific time schedule. Here is the difference between passive and active checks:
Passive checks (polling):
- Zabbix server (or proxy) requests a value from Zabbix agent
- Agent processes the request and returns the value to Zabbix server (or proxy)
Active checks (trapping):
- Zabbix agent requests from Zabbix server (or proxy) a list of active checks
- The agent sends the results in periodically
The image below from Zabbix may help visualise passive and active checks in action:
Step 1: Install and Configure Zabbix Agent
sudo apt update
sudo apt install zabbix-agent
Zabbix agent configuration is /etc/zabbix/zabbix_agentd.conf. Edit
$ sudo vim /etc/zabbix/zabbix_agentd.conf
#Specify Zabbix server IP Address
Server=192.168.10.2

#Specify Zabbix server ( For active checks)
ServerActive=192.168.10.2

# Set this server hostname reported by Zabbix agent
Hostname=ZabbixServer
Restart zabbix-agent after making the change:
sudo systemctl restart zabbix-agent
sudo systemctl status zabbix-agent
If you have ufw enabled, allow port 10050 on the firewall. This is used by Zabbix agent daemon.
sudo ufw allow 10050/tcpStep 2: Add host to Zabbix Server
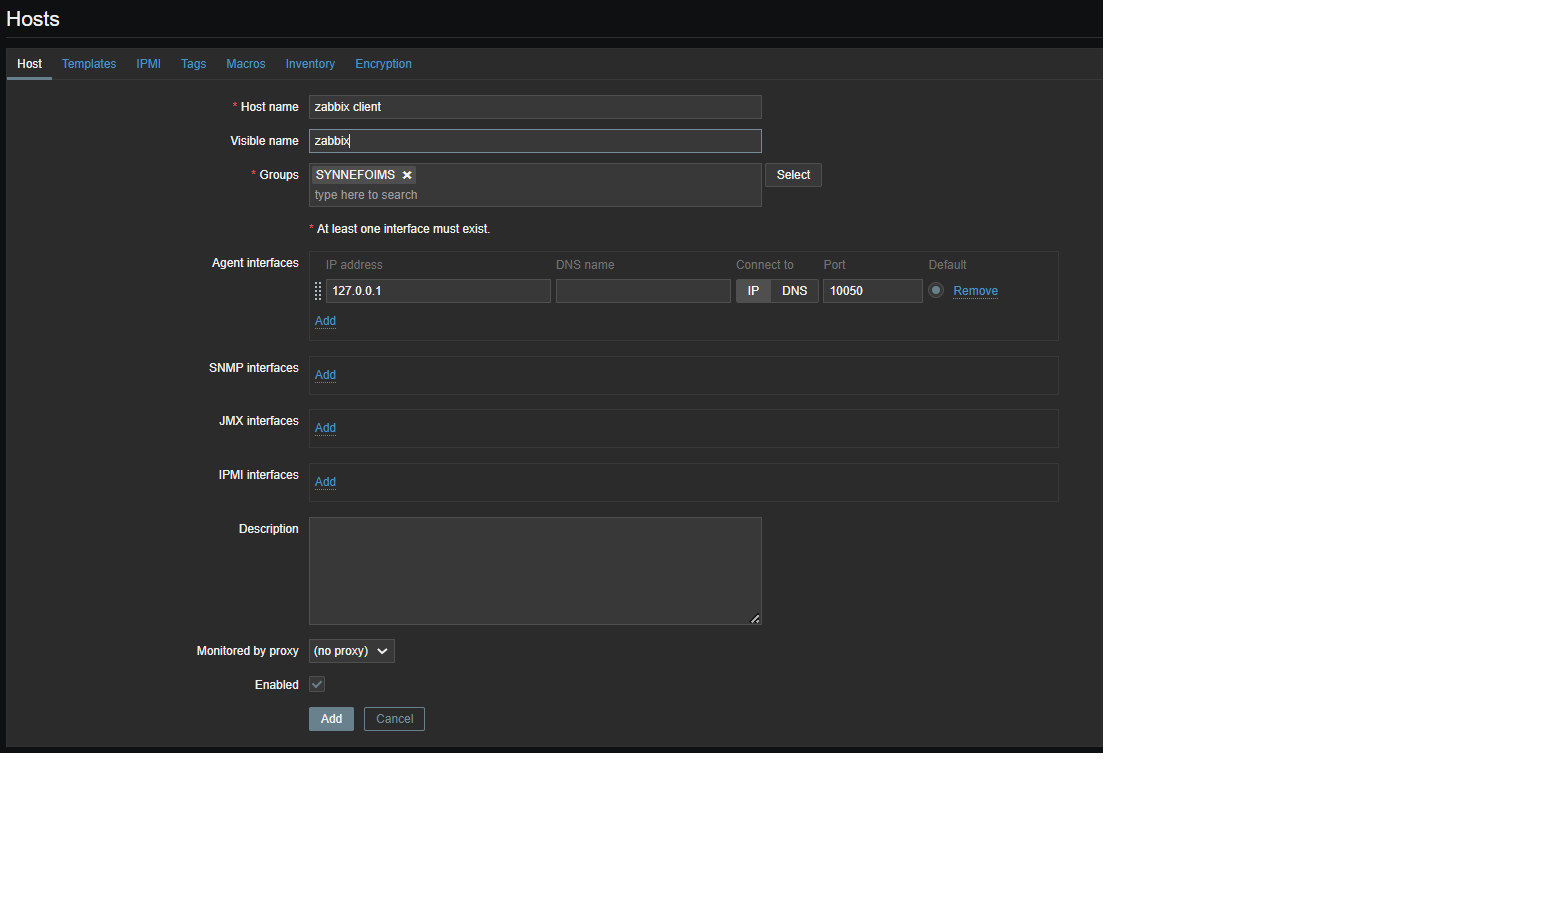
Login to admin Zabbix server interface, and go to Configuration > Hosts > Create host
You’ll need to fill out the following information:
- Host name of the server to be monitored
- Visible name for the server to be monitored.
- Select the group or add a new group for “Groups” field.
- IP address
- Zabbix agent service port -default is 10050
Then to the Templates tab.
1. Click the select button and Link new templates section
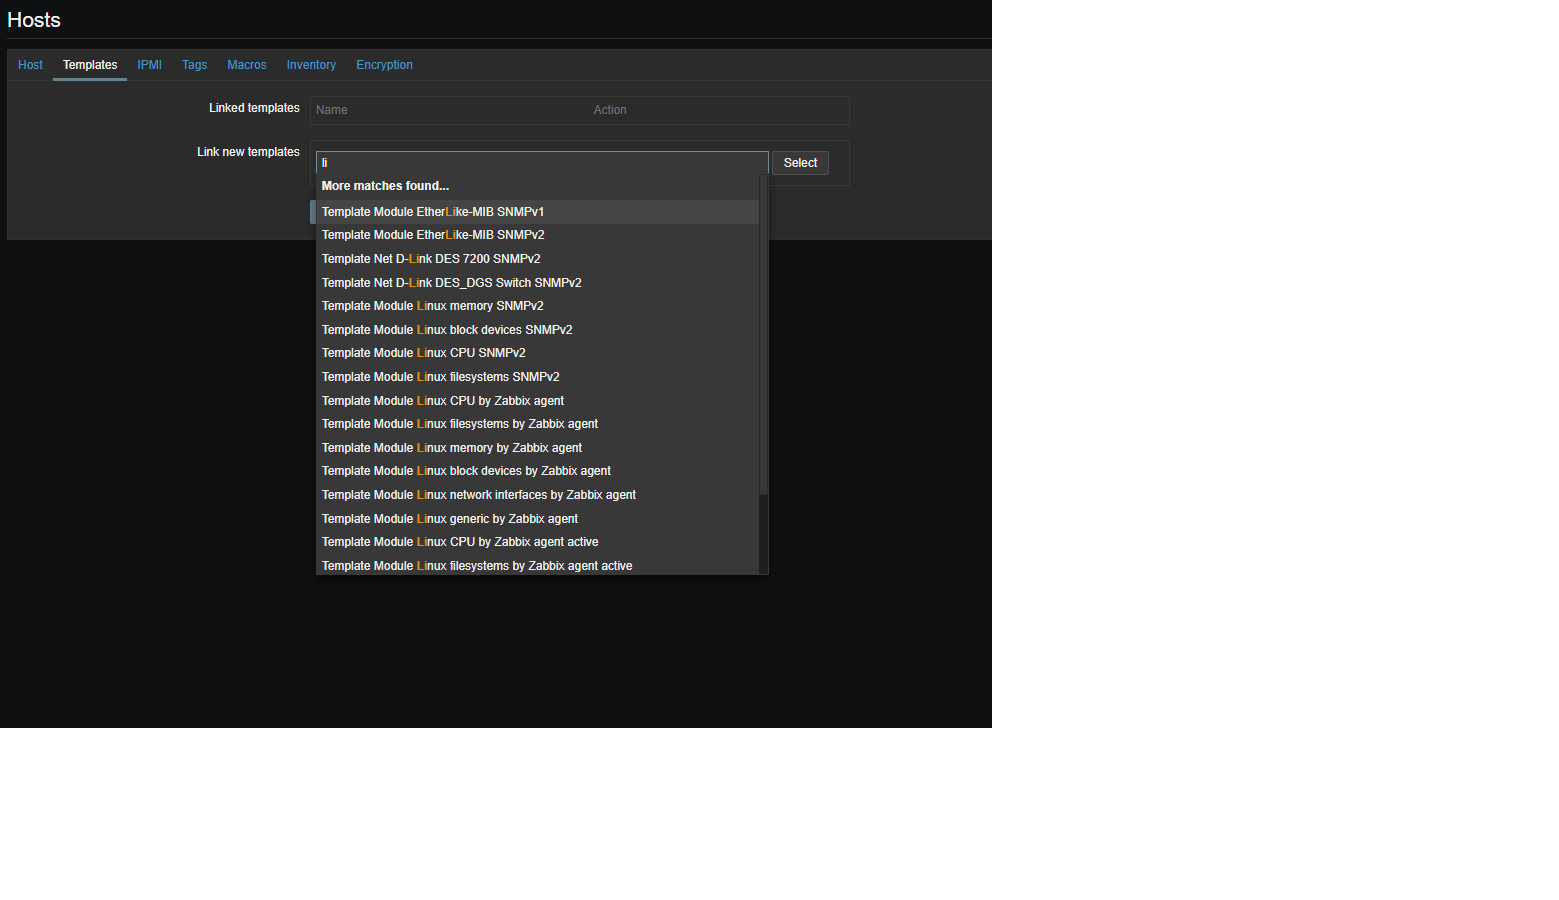
2. Once you have selected the templates click on the Add link to link templates to your target systemAfter the templates are linked, they’ll appear on under Linked templates section
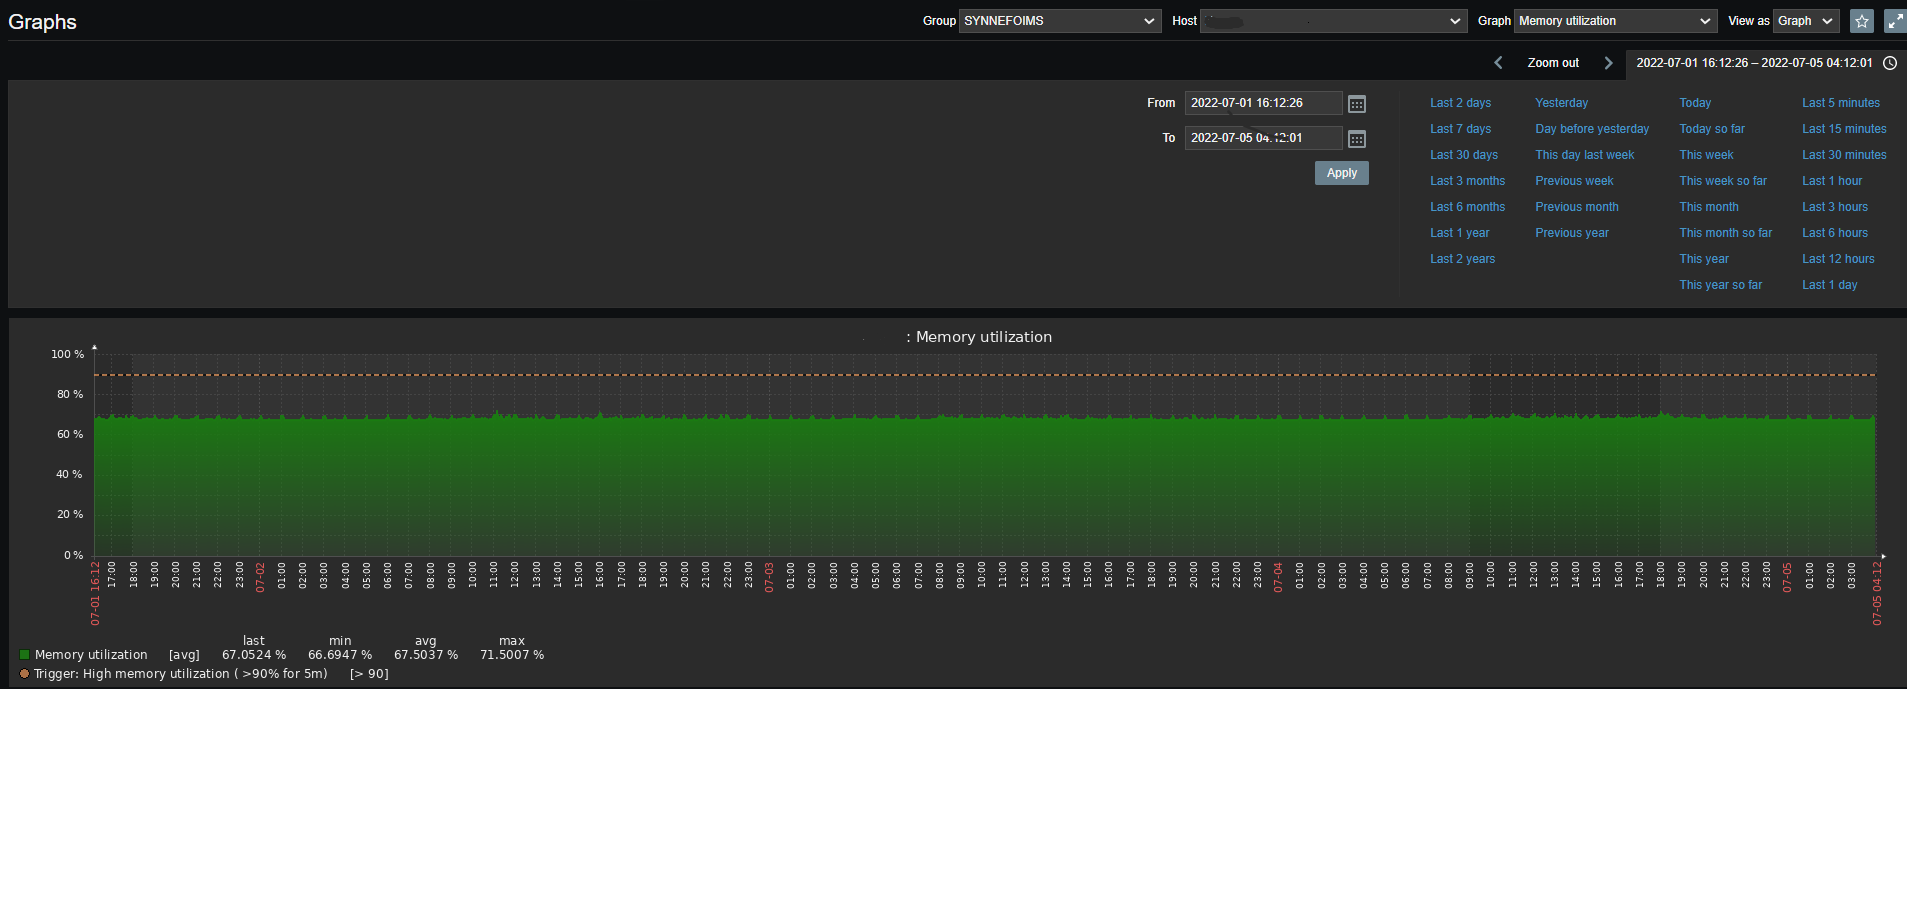
Update the setting using the Update button. After a few minutes, monitoring data will be collected and you can visualise them using Zabbix graphs. Default host graphs can be accessed on
Monitoring > Graphs > <Host|Graph>